Chapter 2 Source code control
2.1 Overview
Source code control systems, version control systems or revision control systems are systems that ease software development in groups. Wikipedia defines them as follows:
A component of software configuration management, version control, also known as revision control, source control, or source code management systems are systems responsible for the management of changes to documents, computer programs, large web sites, and other collections of information. Changes are usually identified by a number or letter code, termed the “revision number”, “revision level”, or simply “revision”. For example, an initial set of files is “revision 1”. When the first change is made, the resulting set is “revision 2”, and so on. Each revision is associated with a timestamp and the person making the change. Revisions can be compared, restored, and with some types of files, merged.
There exist a number of different source control systems such as Subversion, Mercurial, Microsoft Visual SourceSafe, SourceDepot, Git, etc.. Git is currently the most widely used version control system in the world. It is the most recognized and popular approach to contribute to a project, whether it be open source or commercial, in a distributed and collaborative manner. Beyond being a distributed version control system, Git has been designed with performance, security and flexibility in mind.
If you are new to Git it is important for you to differentiate between Git and GitHub:
- Git is a widely used Version Control System (VCS) that lets you keep track of all the modifications you make to your code. This means that if a new feature is causing any errors, you can easily roll back to a previous version.
- GitHub is a widely used platform for version control that uses Git at its core. It lets you host the remote version of your project from where all the collaborators can have access to it. GitHub is like a social platform where you can find a plethora of open-source projects with their codes. All the new and emerging technologies can be found on this platform. You can collaborate on many projects and have discussions on your contributions. There exist also other platforms that enable you hosting of remote Git repositories such as GitLab and BitBucket.
2.2 Why should I know about Git
Where people are often working in groups that are small enough they feel comfortable just keeping their code on Dropbox and trying to make sure that collaborators never work on the same file at the same time (in the hope of never changing the same file). But Git has much to offer to the modern data scientist, even if they only work on small teams and don’t want to contribute to larger software projects or even for personal projects. Some major benefits of using Git are:
- Keep an archive of every version of your project: Git works by logging the work you do on your project into a series of discrete sets of changes called “commits”. Crucially, it remembers all of your commits, making it possible at any time to go back to a previous version of the project. If you discover that you or your collaborator deleted part of your code and you did not notice, can easily recover the version of that file that existed before. Systematically keeping track of the history of your work is also an important component of modern reproducible research, which we discuss in Chapter 3.
- All you and your co-authors to work at the same time: Git treats each line in a text document separately, so if your collaborator is editing the introduction of your paper (assuming it’s in a text format such as LaTeX) while you’re editing the conclusion, Git can easily integrate your simultaneous edits. Moreover, if you do both edit the same line of code or text, then Git will help you resolve those conflicting edits in a very efficient manner instead of what Dropbox does, and leave you to figure out what changes conflicted and how to integrate both authors’ changes.
- You can easily see what changes were made and by whom: Git is organized around keeping track of commits. When your or your collaborator make changes to a file, Git allows you to easily see just the changes your collaborator has made. This makes it much easier for colleagues to be aware of how their project is changing and to watch out of potential issues. For example, you can easily see if your collaborator recoded a variable in a way that is problematic for code you wrote later.
- Allows you to contribute to open source projects: This may not be something you’re planning to do, but learning Git will make this an option. If you find that a package you use doesn’t have a feature you need, the ability to use Git will make it possible for you to add that feature to the package, not only allowing you to do what you want to do, but also making that fix available to the broader community.
- Allows you to make your project open source so others can contribute to your project: If you know Git, you can also share that code in a way that makes it easy for other people to contribute code and improve that package. Also, being active in the open-source community or showing code of your hobby projects in public source code repositories may help you getting a better job.
2.3 Basic Git terminology
2.3.1 Repository
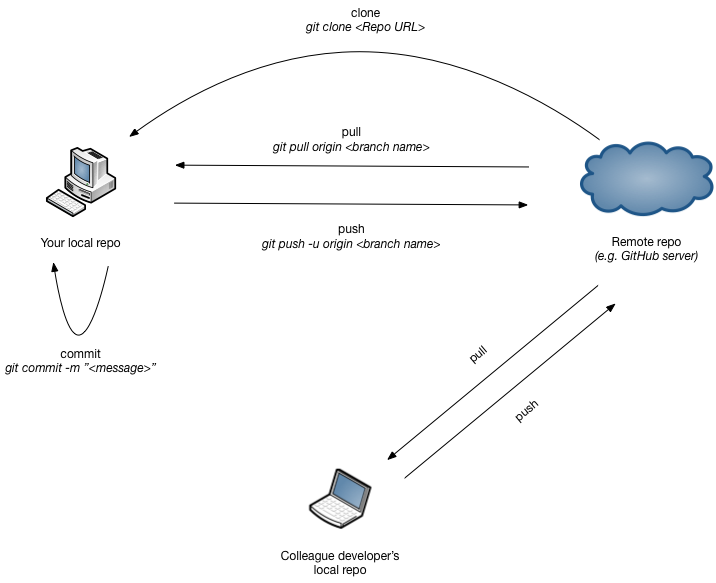
A Repository or Repo is a folder that contains all the project files and the history of the revisions made to each file. The repo stores its data within a .git hidden folder in your project. It contains all the history related to your repository. In general you will work with at least two repositories throughout the lifetime of your project – a Remote repo and a Local repo:
- A Remote repo contains your project that can be accessed from anywhere and by anyone that has access and sufficent rights to the git server (e.g. GitHub). In general you can have multiple remote repositories and push changes selectively to each of them. When you clone a repository for the first time from a remote repo, that remote repo will be named origin and you will be able to push or pull code from it. You can manage connections to the remote repositories using
git remotecommands. - Local repo is a copy of the remote repo that resides on your local machine. All the changes you make are saved in your local repo. Your collaborators will not be able to see them until you push them to the remote repo (and after they browse the remote repo or pull the code locally).
2.3.2 Clone
Cloning means creating a copy of the remote repo on your local machine. After that you can make changes to the local copy of the files, commit them to the local repo and push them back to the remote repo.
If you would like to create a new repository locally without cloning an existing one, you can use the git init command and an empty repository will be created in you current folder. If you would like to publish your repository remotely, you will need to add a connection to the empty remote Git repository (git remote command) and then push commits to it.
CAUTION: You cannot merge two different locallrepositories. So, at project start we create a single repository and all collaborators start by using that repository.
2.3.3 Adding
By default, Git monitors the project folder for changes in files. When you add new files or change existing ones, you need to tell git, which files would you like to include in the next commit using git add command. To check which files will already be included or which files are changed from the last repository state, you can use command git status.
2.3.4 Commit
When you commit changes, you save the changes you made to files in the repo. The changes will consist only of files you had previously added using git add command and will be saved to your local Git repository. To make changes available to others, you need to send changes to the remote repo using the push command.
HINT: If your commit would consist of only the files that Git is already tracking (i.e. no new files), you can use command git commit -a -m "<commit message>".
2.3.5 Push
Push command allows you to copy all the changes from the local repo to your remote repo. Now all the collaborators will have access to the changes and will be able to update their local repositories. You can sync code with multiple remote repositories which is defined by the first parameter (by default it is named origin). The second parameter defines which branch we would like our changes to be copied (by default it is named master - we will cover more about branching in 2.5.2).
2.4 A beginner Git example
Step 0: First we need to install Git. Visit https://git-scm.com/downloads, download the package for your system and install. Depending on your OS there might also exist package managers that provide Git. After you install Git, the ‘git’ command should be available to you in the terminal:
$ git
usage: git [--version] [--help] [-C <path>] [-c <name>=<value>]
           [--exec-path[=<path>]] [--html-path] [--man-path] [--info-path]
           [-p | --paginate | -P | --no-pager] [--no-replace-objects] [--bare]
           [--git-dir=<path>] [--work-tree=<path>] [--namespace=<name>]
           <command> [<args>]

....
Later in the example we use GitHub and if you wish to use SSH links, you need to generate a local SSH key and add it to your GitHub account as described in the documentation.
Step 1: Let’s say you have started with a hobby mini project and wrote a simple script in a file greeter.py:
Now you would like to save it in a Git repository.
Step 2: Move to the folder where greeter.py is located and create an empty Git repository using a command git init. You can observe that a new hidden folder named .git was created in that directory and this is where your local repository resides.
$ git init
Initialized empty Git repository in /Users/slavkoz/Downloads/ds_repo/.git/

$ ls -la
total 8
drwxr-xr-x    4 slavkoz  staff   128 Aug 10 13:34 .
drwxr-xr-x@ 154 slavkoz  staff  4928 Aug 10 13:28 ..
drwxr-xr-x    9 slavkoz  staff   288 Aug 10 13:34 .git
-rw-r--r--    1 slavkoz  staff    44 Aug 10 13:29 greeter.py
To check the status of your repo, issue git status:
$ git status
On branch master

No commits yet

Untracked files:
  (use "git add <file>..." to include in what will be committed)
    greeter.py

nothing added to commit but untracked files present (use "git add" to track)
Step 3: Let’s tell Git to track our greeter.py file and add it to the list for the next commit.
$ git add greeter.py

$ git status
On branch master

No commits yet

Changes to be committed:
  (use "git rm --cached <file>..." to unstage)
    new file:   greeter.py
Now the current version of the greeter.py is staged for commit and we can add it to our repository.
$ git commit -m "Initial version of greeter function."
[master (root-commit) e2f5820] Initial version of greeter function.
 1 file changed, 4 insertions(+)
 create mode 100644 greeter.py

$ git status
On branch master
nothing to commit, working tree clean
After all the changes are committed, we double-check there are no uncommited changes in the project. If we do not provide message parameter ‘-m’ to the git commit command, our default editor is opened to write a commit message. Commit messages should contain a description of the changes we made or and ID of the issue we were working on.
Step 4: In the greeter script we have a typo, so we change the text “Ehlo World!” to “Hello Data Science!”. We must save the file in our text editor so the changes are written to disk, before we proceed! If we check the status of the repo, we will see our file has changed. All the changed files can be commited directly using the git commit -a -m "..." command. If we do not use the -a parameter, we need to first add files to a commit and then issue the commit command.
$ git status
On branch master
Changes not staged for commit:
  (use "git add <file>..." to update what will be committed)
  (use "git restore <file>..." to discard changes in working directory)
    modified:   greeter.py

no changes added to commit (use "git add" and/or "git commit -a")

$ git commit -a -m "Hello text update."
[master e597a5d] Hello text update.
 1 file changed, 1 insertion(+), 1 deletion(-)

$ git status
On branch master
nothing to commit, working tree clean
Step 5: We would now like to provide a more personal script, so we change the greeter.py as follows:
def main():
  student = input("Please enter your name: ")

  print(f"Dear {student}, we are happy to have you in the Data Science track!")

main()
Again, add the file to stage and commit it to the repo.
$ git status
On branch master
Changes not staged for commit:
  (use "git add <file>..." to update what will be committed)
  (use "git restore <file>..." to discard changes in working directory)
    modified:   greeter.py

no changes added to commit (use "git add" and/or "git commit -a")

$ git commit -a -m "Personal update."
[master 29710cc] Personal update.
 1 file changed, 3 insertions(+), 1 deletion(-)

$ git status
On branch master
nothing to commit, working tree clean
The commit command returns how many files were changes and how many lines were added or deleted. Still, it is a good practice to use command git status to make sure that we are not forgetting something.
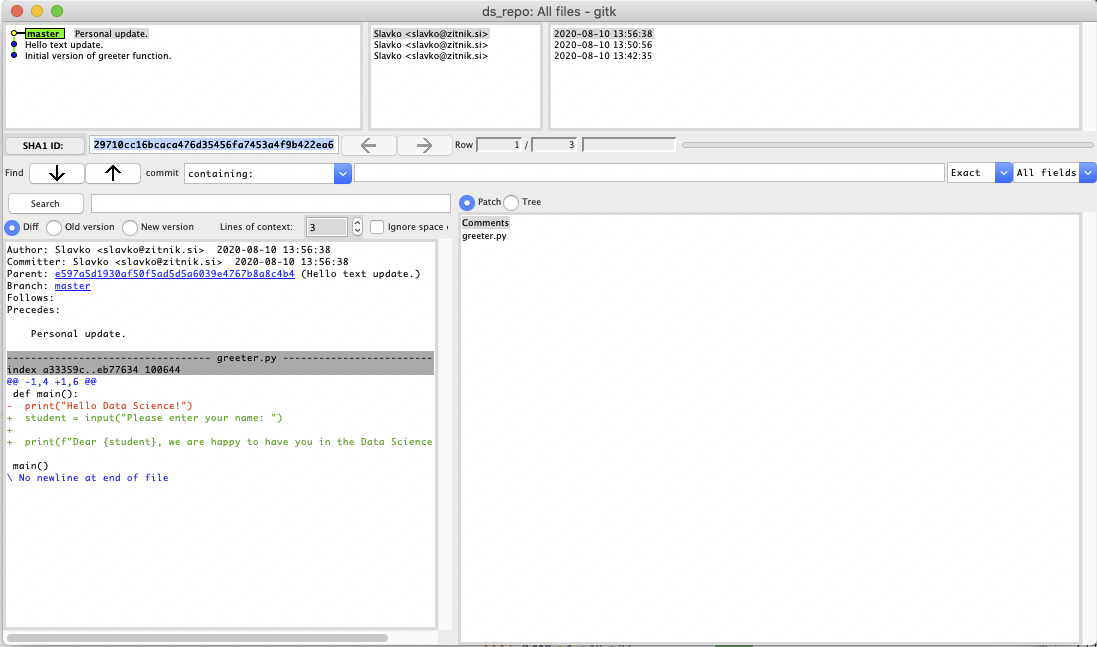
Step 6: Now our project has some history,
$ git log
commit 29710cc16bcaca476d35456fa7453a4f9b422ea6 (HEAD -> master)
Author: Slavko <slavko@zitnik.si>
Date:   Mon Aug 10 13:56:38 2020 +0200

    Personal update.

commit e597a5d1930af50f5ad5d5a6039e4767b8a8c4b4
Author: Slavko <slavko@zitnik.si>
Date:   Mon Aug 10 13:50:56 2020 +0200

    Hello text update.

commit e2f5820364419fa29a17d84392367b90a14d7214
Author: Slavko <slavko@zitnik.si>
Date:   Mon Aug 10 13:42:35 2020 +0200

    Initial version of greeter function.
As we can see, each commit is identified using a GUID which can be used to move our repo to a specific commit or refer to it. Git by default includes a graphical interface gitk to visually browse the history.
There also exist a number of tools work with Git projects (see 2.6).
We can upload our project to GitHub or some other host, so that it is stored in the cloud and, if we make the repository public, that others can contribute. To create a remote Git repository on GitHub, create a new GitHub account and then create a new public repository, named “DS-Project” (DO NOT select to add README or .gitignore!).
When creating a public repository it may be important to define a license for your files in the repository. If a repository has no license, then all rights are reserved and it is not Open Source or Free. You cannot modify or redistribute this code without explicit permission from the copyright holder. It is therefore advisable that you select appropriate license for your source (check GitHub licensing help or Licensing choice helper).
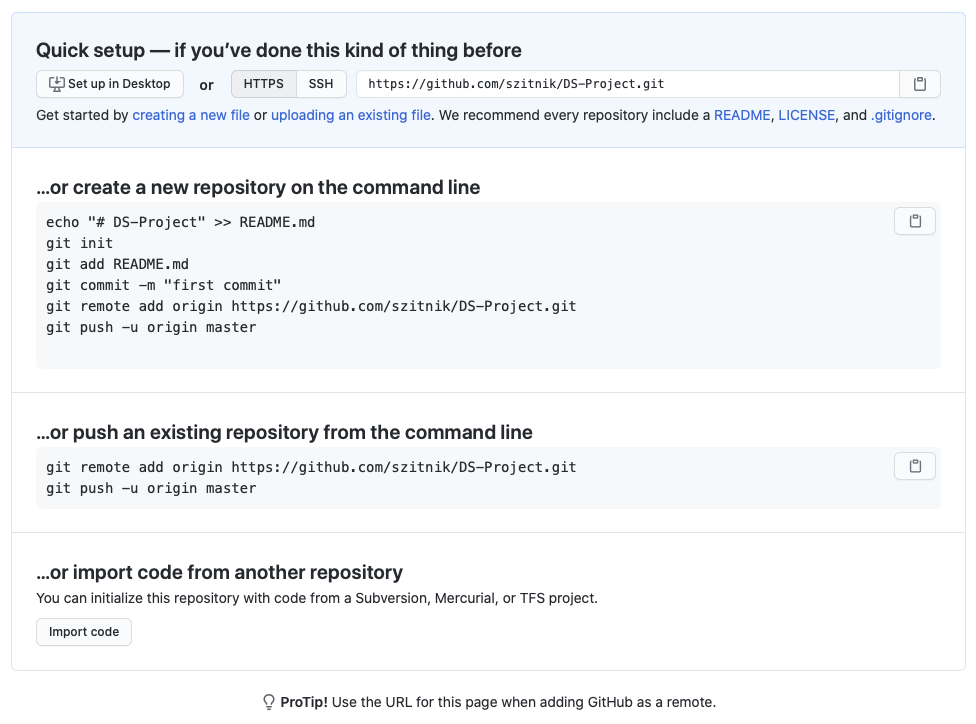 We already have a local repository so we refer to the second set of commands. The first of those commands adds a link to the remote repository and names it “origin” - we could also use any other name. The second command copies all the changes (three commits) to the remote repository to branch named master (default branch). The parameter ‘-u’ sets “origin” as the default remote repository, so we can later use commands git push/git pull without parameters.
$ git remote add origin https://github.com/szitnik/DS-Project.git

$ git push -u origin master
Enumerating objects: 9, done.
Counting objects: 100% (9/9), done.
Delta compression using up to 4 threads
Compressing objects: 100% (5/5), done.
Writing objects: 100% (9/9), 861 bytes | 861.00 KiB/s, done.
Total 9 (delta 0), reused 0 (delta 0)
To https://github.com/szitnik/DS-Project.git
 * [new branch]      master -> master
Branch 'master' set up to track remote branch 'master' from 'origin'.

$ git status
On branch master
Your branch is up to date with 'origin/master'.

nothing to commit, working tree clean
Step 7: You can now browse your repository on GitHub (see commits, update security, add a description, etc.). The public Web site should be accessible at https://github.com/YOUR-GITHUB-USERNAME/DS-Project.
It is good practice to include a short description of your project, installation instructions or other useful data to your repository landing page. This is done by creating a README.md file in the root of your project (read more about this in Chapter 3).
Sometimes we don’t want certain files to be uploaded to the repository. For example, sensitive files, such as passwords, temporary files created by our IDES, compiled programs etc. To ignore files, we can create a .gitignore file and add names of files or folders we would like to ignore (one line per file). Commit and push your file to the repo and Git will automatically ignore them (they will not appear in Git status listing). Note that we can ignore not just individual files but files that match a specific folder structure or pattern, such as extension. Check some examples of ignore files at https://github.com/github/gitignore.
2.5 Beyond the basics
In this section we describe three essential uses of Git: conflict resolution, branching and forking.
We continue with our project from the previous section.
2.5.1 Conflict resolution
Let’s say that two developers A and B are working on a project and have 3 synced repositories (local repo at devevoper A, local repo at developer B and public GitHub repo).
Developer B now changes the text in code to “… you in the Data Science track at the University of Maribor!”, commits and pushes the change to the remote repo.
Step 7: Developer A later changes the text in the code to “… you in the Data Science track at the University of Ljubljana!”, commits file and tries to push the file to the remote repo, after the change by developer B has already been pushed:
$ git commit -a -m "Uni. Ljubljana added."
[master d263b01] Uni. Ljubljana added.
 1 file changed, 1 insertion(+), 1 deletion(-)

$ git push
To https://github.com/szitnik/DS-Project.git
 ! [rejected]        master -> master (fetch first)
error: failed to push some refs to 'https://github.com/szitnik/DS-Project.git'
hint: Updates were rejected because the remote contains work that you do
hint: not have locally. This is usually caused by another repository pushing
hint: to the same ref. You may want to first integrate the remote changes
hint: (e.g., 'git pull ...') before pushing again.
hint: See the 'Note about fast-forwards' in 'git push --help' for details.
Developer A’s push is rejected, because the remote repository contains further commits before his change. A needs to issue git pull to first integrate changes locally and then push them to the remote repo.
$ git pull
remote: Enumerating objects: 5, done.
remote: Counting objects: 100% (5/5), done.
remote: Compressing objects: 100% (2/2), done.
remote: Total 3 (delta 1), reused 0 (delta 0), pack-reused 0
Unpacking objects: 100% (3/3), done.
From https://github.com/szitnik/DS-Project
   29710cc..11483e3  master     -> origin/master
Auto-merging greeter.py
CONFLICT (content): Merge conflict in greeter.py
Automatic merge failed; fix conflicts and then commit the result.
Had A and B worked on separate parts of the project, the changes would be automatically merged. In this case they were working on the same line and Git is not able to automatically merge the code. It needs to be done manually in the greeter.py file:
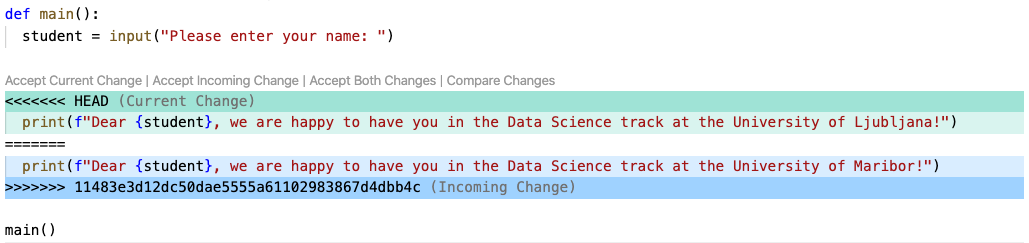
In the conflicted file we are presented both conflicting changes. To resolve the conflict we need to remove lines added by Git and keep the final code (for example, A’s code). Then a new commit and push can be made with merged changes.
# Manually resolve conflict
$ nano greeter.py

$ git commit -a -m "Merged changes."
[master e6deaf6] Merged changes.

$ git push
Enumerating objects: 10, done.
Counting objects: 100% (10/10), done.
Delta compression using up to 4 threads
Compressing objects: 100% (4/4), done.
Writing objects: 100% (6/6), 547 bytes | 547.00 KiB/s, done.
Total 6 (delta 2), reused 0 (delta 0)
remote: Resolving deltas: 100% (2/2), completed with 1 local object.
To https://github.com/szitnik/DS-Project.git
   11483e3..e6deaf6  master -> master
Git includes the tool git mergetool which simplifies conflict resolution. The developer just selects which lines to include in the final decision. Git tools provide further useful features for conflict resolution (see 2.6).
2.5.2 Branching
We have already mentioned that the default branch of a Git repository is a branch named master. When working on a larger project we would like to have the stable code always accessible and separate from development code. Git branches in essence allow us to create multiple repositories in a single Git repository. Therefore we can have a master branch with the tested code that is available to download and other branches which are based on the master branch and contain new features in development.

Step 8: Let’s say our project is mature and many people use it daily. We would like to add parameters to the application and when we complete development and are satisfied with the solution, merge it into the master branch.
First, we need to create a new branch using the command git branch <branch-name>. The command without the name parameter lists branches in the local repo and shows which branch is currently active.
$ git branch parameters-addition

$ git branch
* master
  parameters-addition

$ git checkout parameters-addition
Switched to branch 'parameters-addition'

$ git branch
  master
* parameters-addition
Everything we do with Git is done locally. To make this branch available to others, we need to upload it to the remote repo using command git push origin parameters-addition.
As we are now in a new branch, we update the greeter.py code as follows:
def main():
  print("###################################\nSTUDENT ENROLLMENT FORM\n###################################")

  student = input("Please enter your name: ")
  uni = input("Please enter your University name: ")
  track = input("Please enter your study programme: ")

  print(f"Dear {student}, we are happy to have you in the {track} track at the {uni}!")

main()
Then we commit the change and push it to the remote repo. The testers can now test the code and then we decide to merge the changes into master to make them available to our users.
We move back to the master branch (our changes above are not available there) using the command git checkout <branch-name>. We can now merge the parameters-addition branch into master using the git merge <branch name> -m "message" command.
$ git checkout master
Switched to branch 'master'
Your branch is up to date with 'origin/master'.

$ git merge parameters-addition -m "Track and uni parameters feature added"
Updating e6deaf6..7983f71
Fast-forward (no commit created; -m option ignored)
 greeter.py | 6 +++++-
 1 file changed, 5 insertions(+), 1 deletion(-)
If other changes were made to master while we were developing new features in our branch, they would be merged together. In the case of conflicting changes, we would have resolve them using the procedures we described in the previous section.
A good practice when merging branches is to first merge the main branch into the feature branch, then resolve conflicts, test and then finally merge back into the main branch. Command git log and Git GUIs in particular (see 2.6) implement nice visualizations of connections between branches.
2.5.3 Forking
Forking is not a Git feature but a feature that platforms like GitHub offer to developers. Let’s say a Korean developer finds our repository and would like to translate our project and then publish his addition to our repository. Forking enables him to create a separate clone of our repository under his username. He has all the rights to that repository, but any changes he makes will not affect our repository. After he completes his translation he can send us a pull request to merge his changes into our repository. We can review his changes, ask him to improve the code, and finally reject or accept his changes. In the latter case the changes are then merged with the work in our repository.
Step 9: Let’s say there is Korean developer that is interested in our application and he forks our repo on GitHub.

He then implements additional features and creates a pull request.
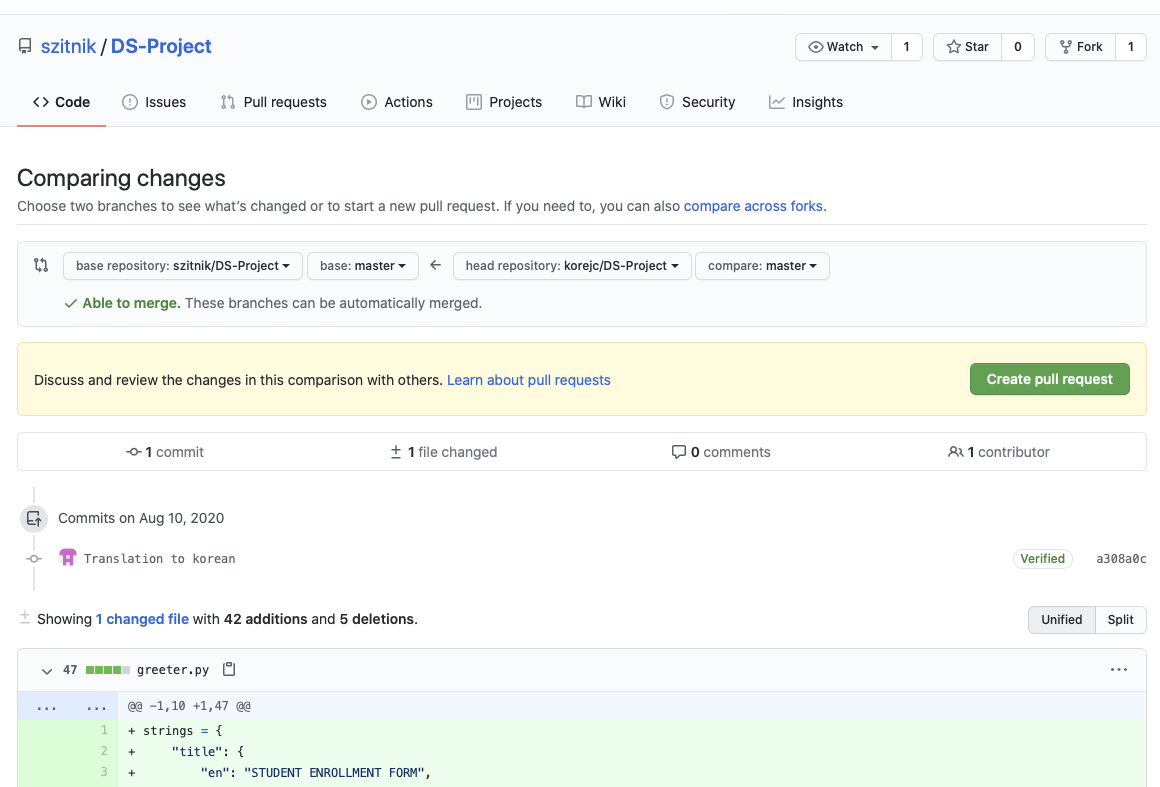
We are notified of his pull request and can review it. We decide that his work would be a valuable addition to our project so we accept the change.
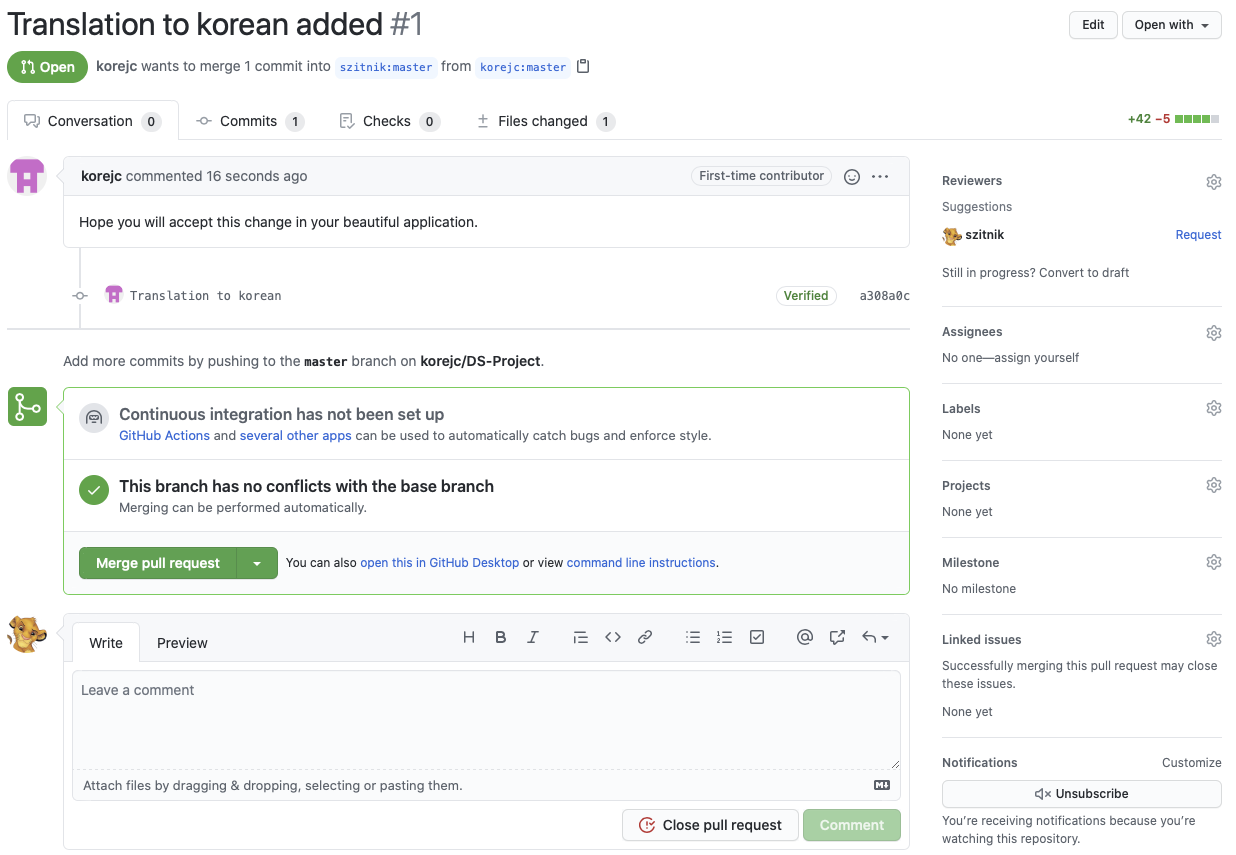
Our repository is now updated with Korean changes.
2.6 Git tools
In the beginning we advise to you to use Git commands manually, so that you are in complete control of what is going on and that you develop a fundamental understanding of what Git does and how it works.
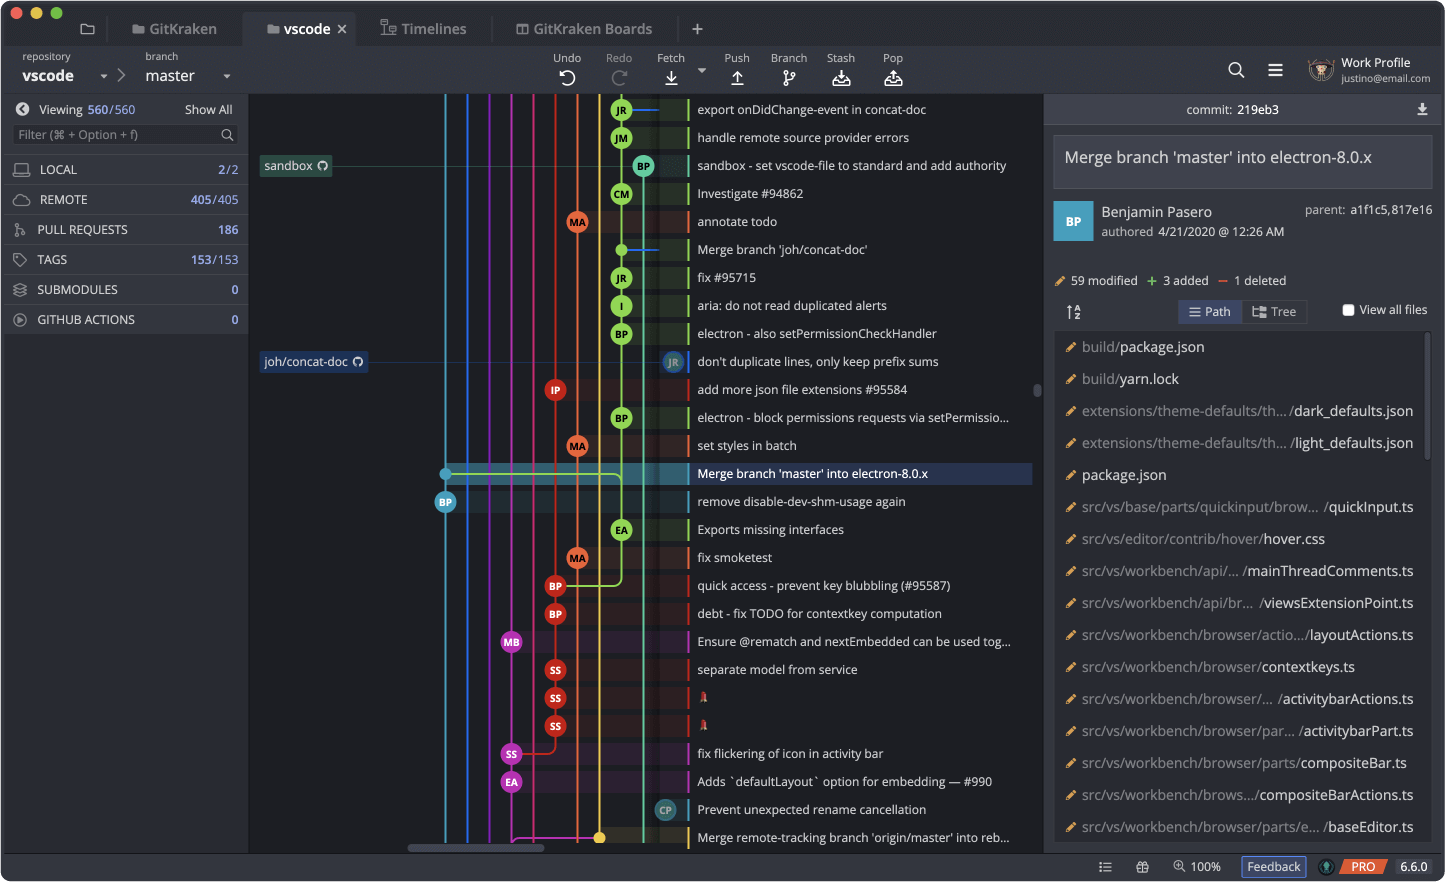
However, in practice, especially if your work includes many Git repositories, collaborators or advanced Git functionalities, you can benefit from using a Git GUI such as the official GitHub Desktop for Windows and Mac or Linux distributions, SourceTree, GitKraken and Tower. These tools provide a high level interface which makes it easier to visually keep track of changes, manage repositories, resolve conflicts, review merge pull requests, etc. Note that some IDEs such as VS Code and IntelliJ integrate Git functionalities.
A typical example of a Git GUI (GitKraken):
2.7 Further reading and references
Official Git source with extensive documentation: git-scm. They provide a free book called Pro Git.
Git tutorials along with more advanced topics such as Git large file storage can be found here: Atlassian Git.
There are many online Git resources and courses, such as A beginners guide.
2.8 Learning outcomes
Data science students should work towards obtaining the knowledge and the skills that enable them to:
- Create their own Git repositories and clone existing repositories.
- Commit, push and pull from Git repositories.
- Work in a collaborative environment, submit issues, create forks and submit pull requests.
Students should also consciously use source control to systematically keep track of their work, including homework, projects and other coursework.
2.9 Practice problems
Take one of your (finished) faculty projects, create an empty GitHub repository and add all of its files to the repository. In a separate commit create a .gitignore file (populate it with common ignores related to your project) and a README.md file. Push everything to remote GitHub repository. Create a separate branch named cleaning and check it out. Now, remove any un-needed files, update few files, update README.md, commit and push changes. Go back to the master branch and change the same line in README.md, commit and push. Then merge branch cleaning into master and resolve conflicts. After merge commit and push. Remove cleaning branch locally and remotely.
Try to find an error or potential improvement to this Introduction to datascience book. Fork the book’s Git repository, make the change and submit a pull request. Then make at least one suggestion of a more comprehensive change to the book (for example, what could be explained in more or less detail, is there an important topic that isn’t covered, etc.) by submitting an issue. If you haven’t yet contributed to a public repository, first check out the first contributions guide by Github.