Chapter 6 Docker container platform
For extreme portability and scalability of our applications there exist tools that can package together the entire required application environment, such as library dependencies or language runtime.
Docker is a set of tools that use operating system-level virtualization to develop and deliver software in packages called containers. The software that hosts the containers is called Docker Engine and was first started in 2013 by Docker, Inc. Docker products are available both in Community and Enterprise editions.
Docker containers are isolated from each other and they bundle their own software, libraries and configuration files. If our application consists of multiple services, containers can communicate with each other through internal or external network configuations. All containers are run by a single host operating system kernel and are thus more lightweight than virtual machines. They are instantiated from Docker images that specify their precise contents. We often create images by combining and modifying existing standard images downloaded from public repositories, also known as image registries. An instance of an image (a container) thus contains configured networking, storage, logging, etc. Furthermore, Docker defines an abstraction for these machine-specific settings and the exact same Docker container can run without any changes on many different machines with many different configurations.
There exist other tools similar to Docker, which may not be that well known or are used for different scenarios, such as Singularity, Nanobox, LXC or NVIDIA/enroot. Another approach of bundling applications into separate environment is using virtual machines, where each virtual machine contains its own operating system. Most common virtualization technologies are VMWare products or Virtualbox. A technology in-between both worlds is Vagrant, which enables a user to script the entire environment but when running the app, Vagrant creates a separate virtual machine (e.g. using Virtualbox) and runs it.
6.1 Why Docker?
Author of a Linux.com article (Noyes 2008) described Docker as follows:
Docker is a tool that can package an application and its dependencies in a virtual container that can run on any Linux server. This helps enable flexibility and portability on where the application can run, whether on premises, public cloud, private cloud, bare metal, etc.
Virtual machines and containers have similar resource isolation and allocation benefits, but containers virtualize the operating system whereas virtual machines virtualize hardware. Therefore, containers are more portable and efficient.
Multiple containers can run on the same machine and share the operating system kernel with other containers, each running as isolated processes in user space. Containers images are typically tens of MBs in size, which is much than typical virtual machines. Containers can handle more applications and require fewer operating systems.
Virtual machines as an abstraction of physical hardware turn one server into many servers. The hypervisor allows multiple virtual machines to run on a single machine. Each virtual machine contains a full copy of an operating system, the application, necessary binaries and libraries. This requires GBs of data - virtual machines require more disk space, physical resources and are slower to boot. The Figure below shows a comparison between multiple running Docker containers (left hand side) and multiple virtual machines (right hand side):
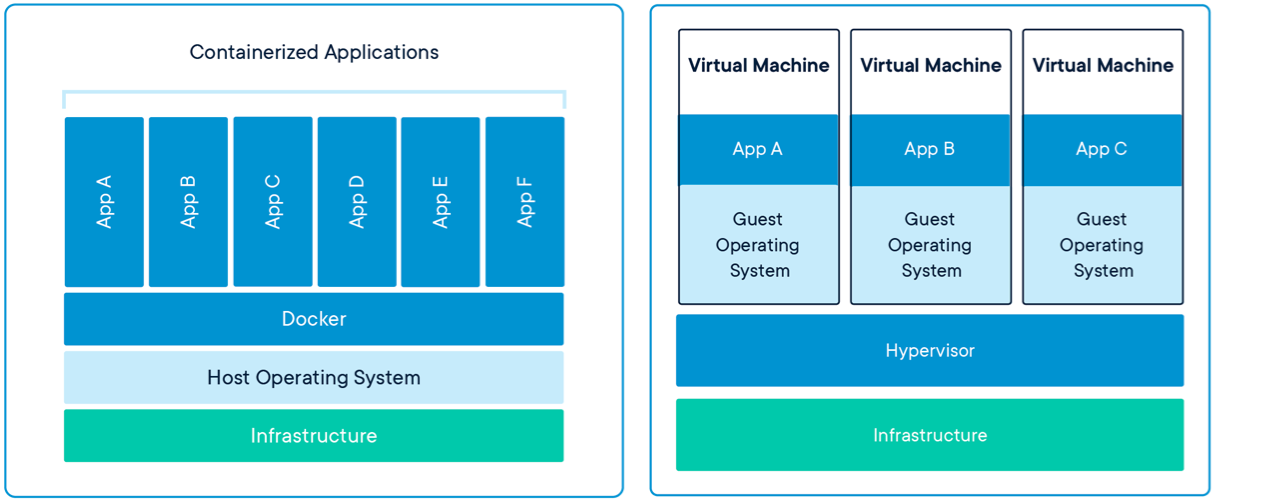
Figure 6.1: Dockerized applications vs. VM-virtualized applications (image courtesy of docker.com).
6.2 Setting up the environment
To install Docker on your machine, you need to download the appropriate Docker Engine Community distribution from the official download website. There also exists a Docker Machine installation package, which is a provisioning and installation software for Docker - we do not need it at this point as it helps us manage multiple remote Docker hosts.
After first installation we can explore different installation settings and tools. Kitematic is a tool which provides a handy GUI to overview downloaded images, containers, volumes and their settings. We can use it as a side-tool for command-line commands we introduce below.
We can check our Docker installation by running docker info to view some status details.
Containers: 0
 Running: 0
 Paused: 0
 Stopped: 0
Images: 0
Server Version: 18.09.2
Storage Driver: overlay2
...
If we experience permission problems, we need to allow our user to work with Docker. Follow the post-installation guidelines.
Now we are ready to test the Docker installation by running the command docker run hello-world. If we see a similar message to the one below, we are ready to begin.
Unable to find image 'hello-world:latest' locally
latest: Pulling from library/hello-world
1b930d010525: Pull complete
Digest: sha256:6540fc08ee6e6b7b63468dc3317e3303aae178cb8a45ed3123180328bcc1d20f
Status: Downloaded newer image for hello-world:latest

Hello from Docker!
This message shows that your installation appears to be working correctly.
...
6.3 Short introduction to Docker
6.3.1 Basics
A Docker container is a runtime instance of an image - that is, an image with state, or a user process. You can see a list of available images using the command docker image ls:
REPOSITORY          TAG                 IMAGE ID            CREATED             SIZE
docker-app          latest              4b727c80cf90        4 minutes ago       475MB
application         latest              cd497ca7013b        19 hours ago        538MB
database            latest              428448bc5e2d        19 hours ago        373MB
ubuntu              18.04               4c108a37151f        4 weeks ago         64.2MB
mysql               5                   a1aa4f76fab9        5 weeks ago         373MB
hello-world         latest              fce289e99eb9        6 months ago        1.84kB
A container is launched by running an image. An image is an executable package that includes everything needed to run an application - the code, a runtime, libraries, environment variables, and configuration files. We have seen the docker run command that takes image name as a parameter. Image name looks like [username/]repository[:tag], where tag is latest by default. To see all the containers on your machine, issue the command docker container ls --all (the parameter –all will also list stopped containers):
6.3.2 Docker application example
To better understand everything, let’s develop a simple web application and run it from within a docker container (solution of this part is available in folder app_only in the GitHub repository).
We have a simple Python web server implementation (server.py)
from flask import Flask
from flask import json
from flask import request
from flask import Response

app = Flask(__name__)

@app.route('/', methods=['GET'])
def index():
    content = open("index.html").read()
    return Response(content, mimetype="text/html")

if __name__ == '__main__':
    app.run(host='0.0.0.0', port=8787)
and accompanying HTML web template (index.html)
<html>

<head>
    <title>..:: Sample application ::..</title>
    <link rel="stylesheet" href="https://stackpath.bootstrapcdn.com/bootstrap/4.1.3/css/bootstrap.min.css"
        integrity="sha384-MCw98/SFnGE8fJT3GXwEOngsV7Zt27NXFoaoApmYm81iuXoPkFOJwJ8ERdknLPMO" crossorigin="anonymous">
    <script src="https://stackpath.bootstrapcdn.com/bootstrap/4.1.3/js/bootstrap.min.js"
        integrity="sha384-ChfqqxuZUCnJSK3+MXmPNIyE6ZbWh2IMqE241rYiqJxyMiZ6OW/JmZQ5stwEULTy"
        crossorigin="anonymous"></script>
    <script src="https://code.jquery.com/jquery-3.4.1.min.js"></script>

    <script>
        $( document ).ready(function() {
            employees = [
                {"name": "John Doe", "hobbies": "I like cycling, mountain biking and skiing!!!", "role": "Director of operations"},
                {"name": "Melanie Oesch", "hobbies": "As the best jodeling singer, the love of my life is singing all day long. I come from Switzerland and have achieved many prizes. Maybe I also visit your hometown and get to know you.", "role": "Chairman of kids programme"},
                {"name": "Vladimir Zookeeper", "hobbies": "Animals are the nicest and very polite creatures in our world. I have observed many species already and I have not found an animal that would harm me without a reason (in comparison to a human being). My dream is to play with animals every day.", "role": "Animal feeder"}
            ];

            function addEmployee(employee) {
                $("#personnelListing").append(`
                    <a href="#" class="list-group-item list-group-item-action flex-column align-items-start">
                        <div class="d-flex w-100 justify-content-between">
                            <h5 class="mb-1">${employee.name}</h5>
                        </div>
                        <p class="mb-1">${employee.hobbies}</p>
                        <small>${employee.role}</small>
                    </a>
                `);
            }

            $.each(employees, function( index, employee ) {
                addEmployee(employee);
            });

            function processForm() {
                employee = {
                    "name": $("#name").val(),
                    "hobbies": $("#hobbies").val(),
                    "role": $("#role").val()
                };
                addEmployee(employee);
                $("#name").val(""),
                $("#hobbies").val(""),
                $("#role").val("")
            }

            // Fetch all the forms we want to apply custom Bootstrap validation styles to
            var forms = document.getElementsByClassName('needs-validation');
                    // Loop over them and prevent submission
                    var validation = Array.prototype.filter.call(forms, function(form) {
                      form.addEventListener('submit', function(event) {
                        event.preventDefault();
                        event.stopPropagation();
                        if (form.checkValidity() === true) {
                            processForm();
                            form.classList.remove('was-validated');
                        } else {
                            form.classList.add('was-validated');
                        }


                      }, false);
                    });
        });
    </script>
</head>

<body>

    <div class="container">
        <div class="row">
            <div class="col-1"></div>
            <div class="col-10">
                <h1>Personnel listing</h1>
            </div>
            <div class="col-1"></div>
        </div>
        <div class="row">
            <div class="col-1"></div>
            <div class="col-10">
                <h2>Add an employee</h2>
            </div>
            <div class="col-1"></div>
        </div>
        <div class="row">
            <div class="col-1"></div>
            <div class="col-10">
                <form id="newEmployeeForm" class="needs-validation" novalidate>
                    <div class="form-group">
                        <label for="name">Name</label>
                        <input type="text" class="form-control" id="name" placeholder="Enter your name" required>
                        <div class="invalid-feedback">
                                Please provide a valid city.
                              </div>
                    </div>
                    <div class="form-group">
                            <label for="hobbies">Hobbies</label>
                            <textarea rows="3" class="form-control" id="hobbies" placeholder="Describe your hobbies" required></textarea>
                    </div>
                    <div class="form-group">
                            <label for="role">Role</label>
                            <input type="text" class="form-control" id="role" placeholder="Role in the organization" required>
                    </div>
                    <button type="submit" class="btn btn-primary">Save</button>
                </form>
            </div>
            <div class="col-1"></div>
        </div>
        <div class="row">
            <div class="col-1"></div>
            <div class="col-10">
                <h2>Employees</h2>
            </div>
            <div class="col-1"></div>
        </div>
        <div class="row">
            <div class="col-1"></div>
            <div class="col-10">
                <div class="list-group" id="personnelListing">
                </div>
            </div>
            <div class="col-1"></div>
        </div>


</body>
</html>
To run the application above, install the Flask library in your Python 3 environment and run the server as python server.py:
* Serving Flask app "server" (lazy loading)
* Environment: production
WARNING: This is a development server. Do not use it in a production deployment.
Use a production WSGI server instead.
* Debug mode: off
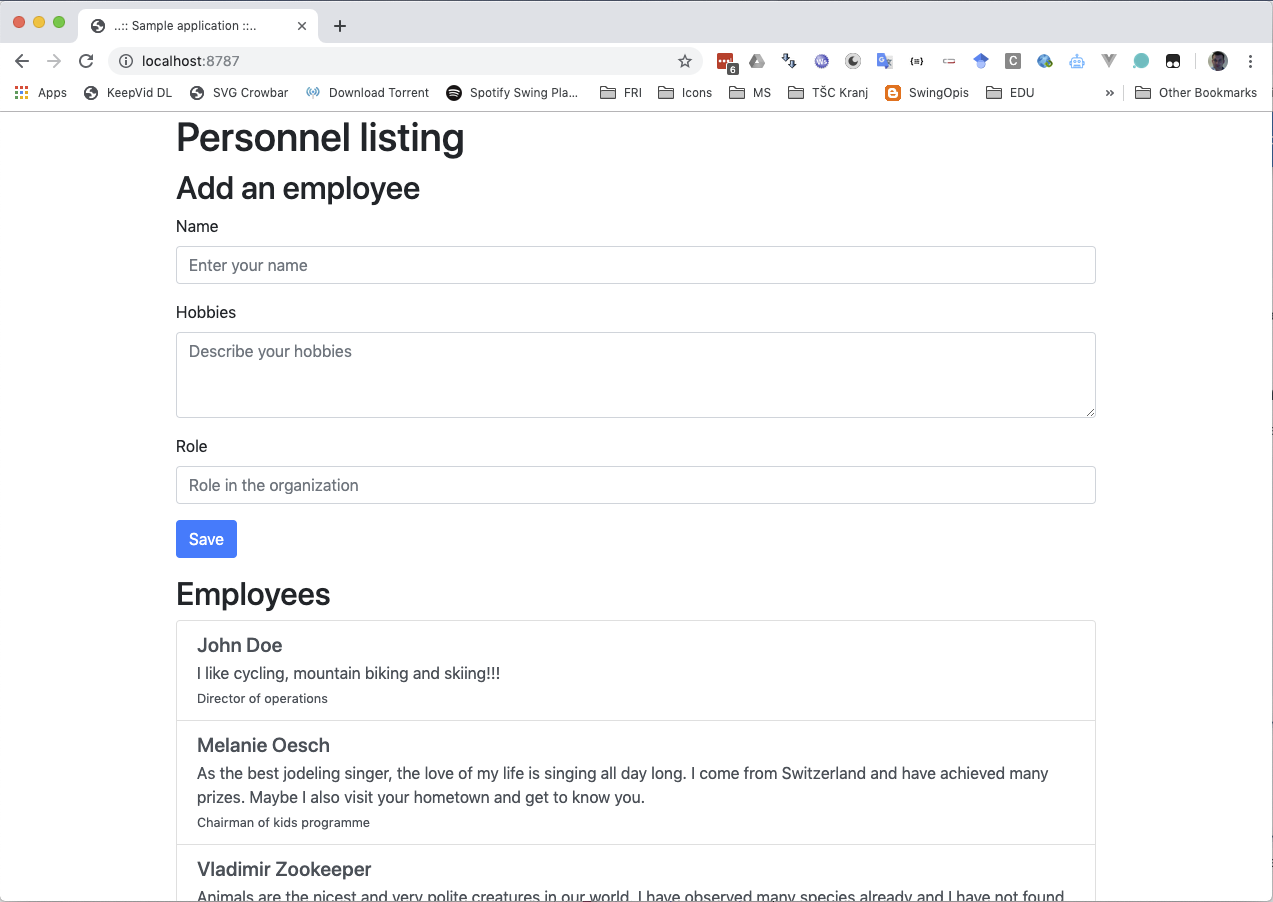
* Running on http://0.0.0.0:8787/ (Press CTRL+C to quit)Your web application is now accessible at http://localhost:8787. It is a simple JS-based we page, where you can add new employees into a local JS list.
6.3.2.1 Dockerfiles
To define a container and be able to create an image, we must write a special file, called Dockerfile. Dockerfile defines what goes on in the environment inside your container. Access to resources like networking interfaces and disk drives is virtualized inside this environment, which is isolated from the rest of our system, so we need to map ports to the outside world, and be specific about what files we want to “copy in” to that environment. After doing that, we can expect that the build of our application defined in this Dockerfile behaves identically wherever it runs.
Let’s create a file named Dockerfile with the following content:
# Use an official Ubuntu runtime as a parent image
FROM ubuntu:18.04

# Set the current working directory to /work
WORKDIR /work

# Copy the current directory contents into the container at /work
ADD ./ .

# Install and configure your environment
RUN apt-get update \
    && apt-get install -y python3 python3-pip \
    && pip3 install flask

# Make port 8787 available to the world outside this container (i.e. docker world)
EXPOSE 8787

# Run server.py when the container launches
ENTRYPOINT python3 server.py
A full list of Dockerfile commands is described at the official Dockerfile documentation.
If there is a need to prepare some specifics in the environment, it can be tedious to manually write all the RUN commands and check whether the application runs as expected. We can therefore always directly run the parent image and enter it’s shell to manually prepare the environment. We then copy the working commands into a Dockerfile and build our image. To create a container from a specific image and access it’s shell, run the following command: docker run -it ubuntu:18.04 /bin/bash.
6.3.2.2 Adding everything together
Now we have the files server.py, index.html and Dockerfile in the same folder. If we move to the same folder, we can build a Docker image named docker-app using the following command docker build -t docker-app .:
Sending build context to Docker daemon  9.728kB
Step 1/6 : FROM ubuntu:18.04
 ---> 4c108a37151f

....

Successfully built 4b727c80cf90
Successfully tagged docker-app:latest
Now the image is available in our Docker system (verify that using docker image command as we did above). To create a running container based on our image, run docker run -p 8787:8787 docker-app:
 * Serving Flask app "server" (lazy loading)
 * Environment: production
   WARNING: This is a development server. Do not use it in a production deployment.
   Use a production WSGI server instead.
 * Debug mode: off
 * Running on http://0.0.0.0:8787/ (Press CTRL+C to quit)
With this command we also map the host’s port 8787 to the Docker container’s port 8787. For additional options of docker run command, see the official reference. Our web application is now accessible at the same address as before, but is now running in a Docker container!
Sometimes we would still like to directly access the shell of a running Docker container and check something (another option would be to install an ssh server into the container and map a port to the host). First, we get the ID of our container using the command docker ps, then we execute docker exec -it CONTAINER_ID /bin/bash. Now we are connected directly to the “machine” that hosts our web application. If our running application generates logs, we can easily access them using docker logs CONTAINER_ID.
6.3.3 Volumes
By default all files created inside a container are stored on a writable container layer. Note that:
- The data doesn’t persist when that container no longer exists and it can be difficult to get the data out of the container if another process needs it.
- A container’s writable layer is tightly coupled to the host machine on which the container is running. You can’t easily move the data somewhere else.
- Writing into a container’s writable layer requires a storage driver to manage the filesystem. The storage driver provides a union filesystem, using the Linux kernel. This extra abstraction reduces performance as compared to using data volumes, which write directly to the host filesystem.
As a result, best practices are to always create containers read-only. Docker thus provides two solutions to store files, which are persisted also after the container removal - volumes and bind mounts.
Volumes are the best way to persist data in Docker.
Commands to manage Docker volumes start with docker volume (add –help parameter to list all options). After the volume is created, we can map it to a specific mount point when running the container (see docker run command reference for more).
6.3.4 Docker application example with multiple services
When developing an application that consist of multiple services, we can also create one “fat” container hosting all the services. This is not the Docker best practice as therefore each service should be run within a separate Docker container.
Let’s upgrade our web application and add database support to it (solution of this part is available in folder app_and_database in the GitHub repository).
6.3.4.1 Web application service
The web application service is similar to the example above. The differences are the installation of an additional mysql-connector-python library into the container (Dockerfile), implementation of REST calls to the backend (index.html) and server endpoints implementation (server.py).
In the implementation we should notice the connection settings from the application to the database. As we said, both services will run separately in a Docker container, so we should provide a connection. When we run the services, we should name the containers and create a network among running services. Connection settings look like:
config = {
  'user': 'root',
  'password': 'BeReSeMi.DataScience',
  'host': 'database',
  'database': 'data_science',
  'raise_on_warnings': False
}
Note that the host setting and port 3306 are used to connect to a MySQL database. In the MySQL container that port will also needed to be exposed within the Dockerfile. Docker services can be connected using separate virtual networks and by default, bridge networks are created to interconnect running containers. For more sophisticated examples, see the official network setting guidelines.
6.3.4.2 Database service
For the database service, we will use already created image, which is available from the public MySQL image repository (for more info on repositories, see section 6.3.4.4). Along with the image, there are also instructions of how to use it with the parameters, where to put initial script files, versions, Dockerfile sources and other references, which ease the deployment process without creating complicated Dockerfiles by ourselves.
In our case the database dockerfile looks as follows:
# Parent image
FROM mysql:5

# Copying all files in curent dir to container
ADD ./ /docker-entrypoint-initdb.d

# Updating permissions for the copied files
RUN /bin/bash -c 'chmod a+rx /docker-entrypoint-initdb.d/*'
Observe that we only copied files into a special folder in the container (/docker-entrypoint-initdb.d) which was previously set as init folder, where all the .sql scripts are run at startup.
To test our Dockerfile, we can also run it separately using the command (from the database folder) docker build -t docker-db . && docker run -p 3306:3306 -e MYSQL_ROOT_PASSWORD=BeReSeMi docker-db. We set the database password of the root user using an environment variable, which can be used to connect to the database. Now we can connect to the database from the host machine - e.g. use MySQL Workbench and connection settings to localhost:3306. A database named data_science should now be created along with the employees table and few entries.
6.3.4.3 Docker compose
Now we know how to create docker containers separately. What remains is to connect them and run them more easily. We will utilize the Docker compose tool.
Docker Compose is a tool for defining and running multi-container Docker applications. It uses YAML files to configure the application’s services and performs the creation and start-up process of all the containers with a single command. The docker-compose CLI utility allows us to run commands on multiple containers at once, for example, building images, scaling containers, running containers that were stopped, and more. The docker-compose.yml file is used to define an application’s services and includes various configuration options.
Before proceeding, we’ll stop all running containers and move to the app_and_database folder. First, let’s check the docker-compose.yml file:
version: '3.7'

services:

  database:
    image: database
    build: ./database
    command: --default-authentication-plugin=mysql_native_password
    restart: always
    environment:
      MYSQL_ROOT_PASSWORD: BeReSeMi.DataScience
    ports:
      - 3306:3306
    volumes:
      - ds_databases:/var/lib/mysql
    networks:
      - dsnet

  application:
    image: application
    build: ./application
    depends_on:
      - database
    restart: always
    ports:
      - "8787:8787"
    networks:
      - dsnet

networks:
  dsnet:
    driver: bridge

volumes:
  ds_databases:
In the docker-compose configuration we define two containers, one named database and other application. Parameter build defines the folder with an appropriate Dockerfile or directly an already built image name. Parameter restart instructs the container to automaticallt restart its service if it suddenly stops due to crash or error.
Parameter depends_on created dependencies between containers, so the application container will be started after the database container is running. Be aware that this is based on the time when service is initializing, so if database script initialization takes a long time, the database service may run later than the application service.
With the volumes parameter we map a specific folder in the container to a named volume db_databases - this folder will contain the database data. We also define a network named dsnet with the bridge configuration and therefore both containers will be able to communicate with each other.
To run the docker-compose configuration, run docker-compose up (for detached mode add parameter -d at the end). Both containers should be created and running - to verify, navigate to http://localhost:8787 and add some employees. Data should be persistent and stored into the database.
To shutdown the containers, press CTRL+C (or run docker-compose down if you started containers in a detached mode).
6.3.4.4 Image registries
We have already mentioned that there exist prepared images, which can be retried from public or private repositories. The two main public registries are Docker Hub and Docker Cloud. Docker Hub is the default registry where Docker looks for images. Docker clients connect to Docker repositories to download (pull) images for use or upload (push) images that they have built.
We have published the image of the first example in the repository szitnik/docker-ds-app (link). You can pull the image (docker pull command) or run it directly with the command:
The functionality should be the same as with the image you created during this tutorial.
To publish images to Docker Hub, we first need to create and account. For example, we could take the built image docker-app from the first example and push it to the Docker Hub using the following commands:
# Provide credentials and login
docker login

# Tag your local image
docker tag docker-app USERNAME/PUBLIC_IMAGE_NAME:TAG

# Publish your image
docker push USERNAME/PUBLIC_IMAGE_NAME:TAG
If we do not define the tag, it will be latest by default. We can access our image via Web interface at https://hub.docker.com/r/USERNAME/PUBLIC_IMAGE_NAME, where we can also add a description, instructions, publish the Dockerfile or connect its content to your Git repository. Now anybody can pull & run our image using the above procedure.
6.3.5 Dockerfile optimizations
The Dockerfile for the image running the Flask server we created above is not written completely according to good practices:
- Copying project files as a first step invalidates Docker cache and causes all others step to execute again. This means that it will install all further requirements, which causes a significant delay as it has to download and install all of them. In Dockerfiles, a proper ordering of commands in very important. Files (as they change frequently) have to be copied into the container as late as possible.
- For Python it is a good practice to use virtualenv even in the container. But using virtualenv in the container may introduce some adaptations in how to activate the environment and run an application in it.
- Python modules in the official Ubuntu repository are old. It is a good practice (very important in production environments!) to lock dependency versions in a requirements.txt file. If you do not lock the versions, the build is not deterministic as it can brake later when a new version of a package is introduced.
Below we show an updated version of a Dockerfile:
FROM ubuntu:18.04

# Install Python
RUN apt-get update && \
    apt-get install -y --no-install-recommends python3 python3-virtualenv

# Create virtualenv
ENV VIRTUAL_ENV=/opt/venv
RUN python3 -m virtualenv --python=/usr/bin/python3 $VIRTUAL_ENV
ENV PATH="$VIRTUAL_ENV/bin:$PATH"

# Install dependencies:
COPY requirements.txt .
RUN pip install --no-cache-dir -r requirements.txt

# Make port 8787 available to the world outside this container (i.e. docker world)
EXPOSE 8787

# Copy the application:
COPY server.py .
COPY index.html .

# Run the application
CMD ["python3", "server.py"]
and a requirements.txt file:
Flask==1.1.16.4 Further reading and references
- Check the Docker official web page and the Docker tutorial.
- Depending on your OS, newest version of Docker also includes a nice tutorial you can follow (issue
docker run -dp 80:80 docker/getting-startedand then navigate to http://localhost/tutorial/. Another useful hands-on tutorial is available at https://labs.play-with-docker.com. - For more advanced topics get to know container orchestration solutions like Docker Swarm or Kubernetes.
- Docker in Action book teaches readers how to create, deploy, and manage applications hosted in Docker containers.
- The Docker Book is inteded for complete beginners offering 268 pages of demos and live tutorials.
- Docker Cookbook presents more advanced Docker techniques like mounting data across multiple servers, distributed containers, detailed monitoring, networking across multiple hosts, accessing Docker in the cloud and merging with other platforms like Kubernetes.
6.5 Learning outcomes
Data science students should work towards obtaining the knowledge and the skills that enable them to:
- Use and extend existing Docker image.
- Package an application consisting of multiple services into one or more containers and manage them.
- Publish reproducible algorithms to Docker Hub.
6.6 Practice problems
- Create a simple Python program or web application, write a Dockerfile to compile an image an publish it on Docker Hub. If you are more proficient with some other language, use a framework of your choice.
- Write a service which needs multiple servers deployed and run everything using Docker Compose. Dockerize your Introduction to Data Science project and publish it to Docker Hub. Add instructions of how to use your image.